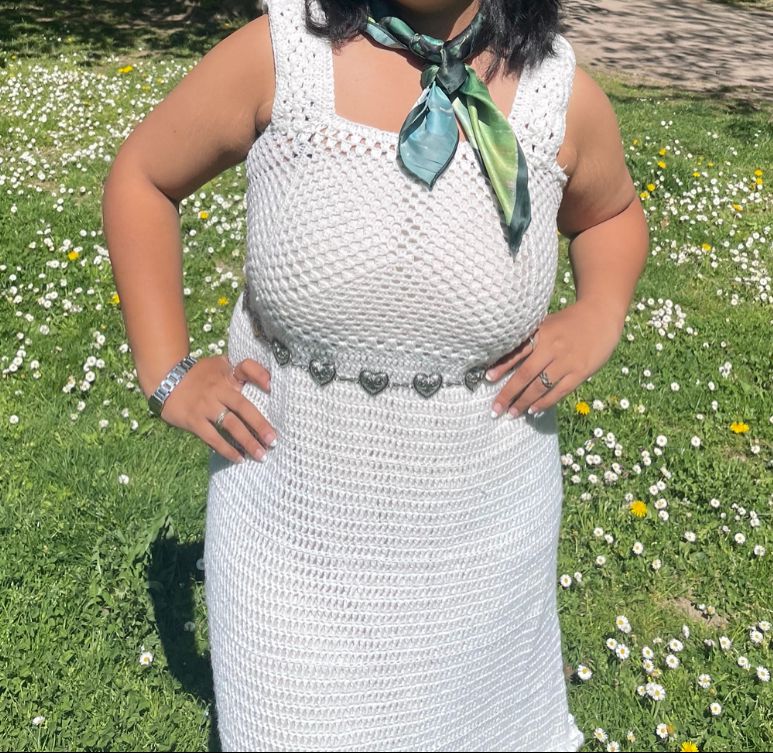
When I decided to make my first crochet dress, I had no idea it would take a month. But honestly? It was worth every hour. And the best part? I didn't follow a pattern. I just adapted as I went. Why I Started This Project I'd been crocheting for a while and felt ready to challenge myself with something wearable. Blankets and amigurumi are great, but wearing something you made? That's next level. I wanted to create something that flowed beautifully and fit my body perfectly, so I decided to freestyle it. The Biggest Challenge: No Pattern Most people start with a tested pattern. I didn't. Instead, I used measurements, tried it on constantly, and adjusted as I went. This sounds chaotic, but honestly, it forced me to understand construction in a way following a pattern never would have. The Stitches I Used The Skirt Section: I used Triple Crochet stitches for the entire skirt. Why? Because triple crochet is TALL and creates beautiful drape and flow. But here's the key — I adjusted my tension constantly. When I wanted the fabric looser and more flowing, I loosened my tension slightly. When I wanted it tighter (near the waistband), I kept tension firm. This gave me control over the drape without changing stitches. I just kept going row after row, increasing stitches when needed to keep it shaped, until the skirt reached my desired length (knee-length in my case). The Top Section: This is where it got interesting. For the top, I wanted an opaque, textured, knotted finish so the chest area wouldn't be see-through. Here's what I did: - Front Loop Single Crochet (FLSC) on one row — this creates that lovely bumpy texture on the back - Then Single Crochet in the back loop only (BLO) on the next row - Alternating these two stitches back and forth created a dense, knotted finish that looked professional and was completely opaque The texture is visible and intentional, and it gives the top real structure. Fitting as I Went This was crucial. Every few rows, especially once I got to the top section, I tried the dress on. I: - Checked if the waist was sitting right - Made sure the length was tracking correctly - Adjusted increases/decreases based on how it fit - Took photos of the fit to reference later If something wasn't working, I could adjust before I got too far in. Connecting the Pieces Once I finished the skirt and top separately (well, mostly — I was working on this continuously), I connected them the same way you'd join granny squares: - Laid both pieces flat - Used slip stitches to connect the top of the skirt to the bottom of the top section - Made sure the seams were even and the transition was smooth - Wove in all the ends carefully so they wouldn't show Final Details Once everything was connected, I: - Tried it on one final time to make sure the fit was perfect - Added straps (I used single crochet to create simple, sturdy straps) - Blocked the dress to even out the stitches and help it hold its shape - Added finishing touches like adjusting the neckline The Yarn I Used [cotton acrylic blend, 4mm hook, , white-beige] I chose this because [why you picked it — durability, drape, beginner-friendly, price, etc.] What I Learned Making This Dress 1. You don't need a pattern if you understand basic construction — measure, try on, adjust 2. Triple crochet gives amazing flow for skirts, but tension control is everything 3. Alternating FLSC and BLO stitches creates dense, textured fabric that's perfect for opacity 4. Trying on as you go saves you from major mistakes later 5. Blocking really does make a difference in how professional it looks 6. Be patient — a month is realistic for a quality wearable project Tips for Making Your Own Freestyle Wearable Start with basic measurements (bust, waist, length) but don't be locked in. Crochet is forgiving. Try it on constantly — more often than you think you need to. Use stitches you're comfortable with. You don't need fancy stitches for a beautiful garment. Tension is your best friend. Master it, and you can control how your fabric looks and drapes. Don't rush. This isn't a race. Take progress photos. You'll want to remember how you did this. Keep notes on what stitches you're using where — seriously, write it down. Is It Worth It? 100%. There's nothing like wearing something you spent a month creating. The fit is perfect because YOU shaped it. The stitches are exactly how you wanted them. It's genuinely one of my proudest makes. If you're thinking about making your first wearable project, GO FOR IT. Don't be intimidated by not having a pattern. Sometimes that's exactly when the best things happen. Questions? Drop them below — I'd love to hear if you try making your own freestyle dress!